Saturday, May 28, 2011

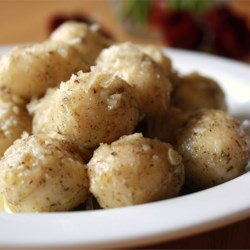
Gnocchi with _________ Butter Sauce


The other day I was looking for a really light dinner option. I had bought some gnocchi a while ago and found it hiding in the back of my pantry. I have only made gnocchi a couple other times in the past and Josh hasn't been the biggest fan. I, on the other hand, really enjoy it. Well this time I was able to win Josh over. I made this new recipe but with a few modifications. The recipe calls for sage, in fact the name of the recipe is supposed to be "Gnocchi with Sage-Butter Sauce" but I didn't have any sage so instead I substituted in Italian Seasoning. When Josh tasted the finished product he suggested I toss in a bit of chopped pepperoni (one of Keller's favorites.) I took his advice and in the end it tasted like gnocchi pizza. Add a bowl of fruit on the side and in ten minutes you have a simple and tasty dinner. 
Note the recipe title change. To us, this is now "Gnocchi with Italian-Butter Sauce" but maybe you'll find another substitute for sage that will be just as great. And if you do, be sure to share!

Gnocchi with Italian-Butter Sauce
2 (12 ounce) packages potato gnocchi
1/4 cup butter
1 clove garlic, minced
1 teaspoon dried Italian seasoning
1/4 teaspoon salt
1/4 cup grated Parmesan cheese
1/4 teaspoon ground black pepper
2 tablespoons grated Parmesan cheese
1/4 cup chopped pepperoni

Bring a large pot of lightly salted water to a boil over high heat. Add the gnocchi pasta, and cook until they float to the surface, 2 to 3 minutes; drain.
Melt the butter in a skillet over medium heat. Stir in the garlic, and cook until the garlic has softened and is beginning to turn golden brown, about 4 minutes. Stir in the Italian seasoning and salt for a few seconds, then add the cooked gnocchi.
Toss gently with 1/4 cup of Parmesan cheese, pepperoni and the pepper.
Sprinkle with the remaining 2 tablespoons Parmesan cheese to serve.

Oops, I can't remember where I found this recipe. I'll have to look it up and get back to you. 

Friday, May 27, 2011

Mushroom Quiche


If you follow my blog regularly then you already know that I'm a lover of mushrooms. It's a weird food to love, I know, but I've always enjoyed them, raw or cooked. When I found this recipe in Costco's cookbook In the Kitchen: The Costco Way, 2008 I was very excited. When I think about picnics with my family I think of quiche. And with the warmer weather approaching (I hope!) I thought you might enjoy this quiche for your next picnic.

Famous Mushroom Quiche
1 unbaked 9-inch pie shell
4 cups sliced fresh mushrooms
1 tablespoon butter
1 cup shredded Swiss cheese
2 tablespoons flour
3 eggs, lightly beaten
1 1/4 cups milk
1 tablespoon minced fresh parsley
1 teaspoon garlic salt
1/2 teaspoon pepper

Preheat oven to 425 degrees.
Bake pie shell for 10 minutes, remove and let cool.
Saute mushrooms in butter over medium-high heat until tender. Remove from the pan with a slotted spoon and set aside. 
In a bowl, toss cheese with flour; add eggs, milk, parsley, garlic salt and pepper. Stir in mushrooms. Pour into crust. 
Bake for 1 hour, or until set, covering edges with foil to prevent overbrowning, if needed. Let stand for 10 minutes before cutting. Take to the park and enjoy!

This recipe is from the cookbook In the Kitchen: The Costco Way, 2008. 

Thursday, May 26, 2011

Lemon Vinaigrette

I just want to start by saying thank you to everyone who reads this blog. I appreciate all of your comments and feedback and I love knowing that people are looking forward to the next recipe I post...even if it may take me weeks to do it. :) 

On my blogsite there is a place for others to submit their favorite recipes and I'm so excited to share the first submission I received! Thank you Evelyn for sharing this Lemon Vinaigrette recipe with us. "Here's one of my favorite, and very easy, dressing recipes. I've made it a number of times. The only thing I would recommend is make sure to add at least as much zest as it calls for - don't skimp. I personally love lemon, so maybe that's why I'm a fan!" 


Lemon Vinaigrette
Yield Makes 1/2 cup 

Ingredients
1 teaspoon Dijon mustard
1 1/2 teaspoons finely grated lemon zest
2 tablespoons plus 1 1/2 teaspoons freshly squeezed lemon juice
Coarse salt and freshly ground pepper
6 tablespoons extra-virgin olive oil

Directions
Combine mustard, lemon zest, and juice in a jar; season with salt and pepper. Add some of the oil, then cover and shake to combine. Continue adding more oil and shaking until all the oil is incorporated and mixture is thickened and uniform in color. Serve immediately.


Evelyn found this recipe at Martha Stewart.com. Thanks for sharing, Evelyn!

If you would also like to submit a recipe to Meals By Mel, click here. This form can also be found on the "Contributions" tab at the top of the page. Thanks!

Wednesday, May 25, 2011

Fruity Quinoa Yogurt


The last "no oil, no fat" recipe that I made while Josh was prepping for surgery was Fruity Quinoa Yogurt. I originally made it as a snack but it ended up being served as dessert two nights in a row. On it's own, it's got a  interesting texture, but if you use it as dip for strawberries, apples or pears, it's great. And knowing that I'm eating a healthy dessert rather than ice cream or pie makes it even better.

Fruity Quinoa Yogurt

1/2 block firm, silken Tofu
1 c. Strawberries (I used frozen)
1/2 c. cooked Quinoa
1 t. Maple Syrup
1/2 t. Vanilla

Add all ingredients to a food processor and process until smooth. The quinoa will give it texture, in addition to lots of protein and fiber. Eat this straight or with sliced fruit.

This recipe was found, along with many other great vegan recipes, at FatFreeVegan.com

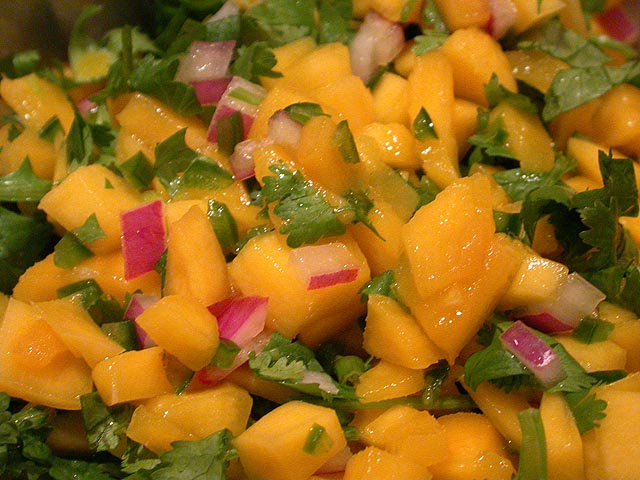
Tilapia with Mango Salsa


This is an original Melissa recipe! Bet you never thought you'd get one of these. :) Remember my very first blog post when I said I was a recipe follower, well as true as that is, every once in a while I can get creative. I'm not a big tilapia fan, or at least I wasn't, but I was on a mission. My goals were to: use white fish, not use any oil and find something to do with a very ripe mango. Tilapia with Mango Salsa is what I came up with. I was pleasantly surprised at how tasty Tilapia can be. Hopefully you'll agree. I'm not very good with measurements when I'm being creative in the kitchen so bare with me. 

Tilapia with Mango Salsa
2 - 4oz tilapia fillets
1 lemon, sliced
parchment paper
1 large mango, diced
1/4 red onion, chopped
1/4 cup cilantro, chopped
juice of 1 lime
1 1/2 teaspoons agave nectar

Preheat oven to 425 degrees.

Place the tilapia fillets on a flat sheet of parchment paper and place lemon slices on top of fish. Bring long ends of paper together and fold down 3 times to make a seam. Place on baking pan and tuck ends underneath so your fish is completely sealed. Place the fish on a baking sheet and bake for approximately 12 - 15 minutes. If fish isn’t opaque at center, reseal packet and return to oven. Check again after 5 minutes.

To make the salsa, combine the mango, red onion, cilantro, lime juice and agave nectar. Refrigerate salsa while fish continues to cook. This will give the salsa a little time to infuse all of the flavors together.

When fish is done, remove lemons and serve with mango salsa. Brown rice is a nice accompaniment to this dish. Enjoy!

This recipe is an original creation from Meals By Mel

Saturday, May 14, 2011

Creamy Clam Chowder

Josh and I are so happy we found this recipe. It's currently one of our favorites. Who knew Clam Chowder could be so easy to make, taste so good and still be healthy! It takes 5 minutes to throw everything into the pot, 15 minutes to simmer and voila! The best part of this recipe is the coconut milk. It gives the soup a creamy buttery taste. Mmm. Last night I served this with wheat sourdough bread. I hope you enjoy this as much as we do.

Creamy Clam Chowder
2 cups cubed russet potatoes (about 2 medium)
1 cup sliced carrots (about 2 medium)
1/2 cup chopped onion
1 can broth (about 2 cups)
1/2 cup water
1/2 tsp salt
1/4 tsp white pepper
1/4 tsp black pepper
2 - 6.5oz cans whole baby clams, undrained (frozen also works)
1 can (15 oz) - white beans, drained

1 can coconut milk (about 1 1/2 cups to 2 cups)
2 Tbs chopped fresh chives (1 Tbs dry*)
1 tsp paprika

Put everything except the coconut milk, chives and paprika in a large enough pot. Bring to a boil, cover and simmer 15 - 20 min. or until potatoes are tender. Stir in remaining ingrediants, and heat through. *If you're using dry chives, add it in the beginning.

Serve with bread and salad.

I stumbled across this recipe when looking for recipes with no oil. So happy I found it in this
forum

Tuesday, May 10, 2011

Smoothies

Last week we found out that Josh needs to have his gallbladder removed. The gallbladder is used to help digest fats so when we found out that he was on a strict no fat, no oil diet it gave me a opportunity to find some new recipes. (We have to look on the bright side with these sorts of things, right?) We've really been enjoying the meals we've been making. All this week I plan to post the recipes we've been making beginning with smoothies! One of the easiest way to eat lots of fruits and veggies is by blending them up. Here are two of the smoothies we tried and we enjoyed.

And for those wondering, Josh's surgery is scheduled for tomorrow morning. Once the surgery is over he won't be on such a strict no fat diet so Josh has put in a special request for: homemade pizza, hash browns, a burger and cookie dough. :) 


Creamy Pumpkin Smoothie
1 15oz can Pumpkin

1/2 cup Soy Milk
1 tablespoon Maple Syrup or Agave Nectar
1 teaspoon Pumpkin Pie Spice
1 Banana
1/3 cup Apple Juice Concentrate
Ice
Process all ingredients in a blender until smooth.

I also recommend:

Green Goddess Smoothie
 

1 cup non-dairy Milk
1 peeled Orange
2 cups Kale or Spinach
1 peeled Banana
1 Pear, cut into quarters
1 cup Grapes, red or green
Blend all ingredients until smooth. This is best cold so either use frozen bananas or refrigerate for 30 minutes before eating.

Both recipes can be found at FatFreeVegan.com


Friday, May 6, 2011

Quick & Crusty French Baguettes


HELP! Back in March I attempted to make this quick bread recipe -- twice. Neither time was I able to get the dough to form. I decided to go ahead and post this recipe anyway despite my failure at it. If any of my readers are able to be successful at this recipe I'd love to hear about it. I want to know how I can make quick baguettes so I'm asking for your help. Please try this recipe and report back. Was it a flop for you too? Or were you able to enjoy this simple recipe?

Quick & Crusty French Baguettes
2 cups very warm water
1 packet yeast
2 tablespoons sugar
1 1/2 teaspoon salt
3 cups flour

Preheat the oven to 425 degrees.  In a large bowl, whisk together the warm water, yeast, and sugar.  Set the bowl on top of your preheating oven for ten minutes.  Stir in the salt and add the flour a half-cup at a time, until the dough becomes soft but not sticky.  Knead the dough until elastic.

Cut the dough into four even pieces.  Roll each of them into four long, thin ropes.  Twist together two of the ropes to form one loaf.  Twist the other two ropes together to form a second loaf.  Transfer both onto a large baking sheet lined with parchment paper.

You can now bake the loaf right away (if you’re in a hurry) or allow it to rise for an additional 15-30 minutes on top of your warm oven.

Now for the SECRET: Fill a large bowl with 3-4 cups of ice.  Open your hot oven and place the baking sheet with the baguettes inside, then toss the ice cubes on the bottom of the oven and quickly shut the door.  Do NOT open your oven for 15 minutes.  Bake until golden brown, about 15-18 minutes.

Serve fresh and hot with your favorite olive oil for dipping.
Recipe found at Babble.com

Wednesday, May 4, 2011

Romaine Salad with Choice of Raspberry Vinaigrette or Creamy Italian Dressing

Bummer, I have no beautiful photo to accompany this recipe. I always love photos but I take very poor food images so sadly, you'll have to go without this time. But I'll make it up to you by giving you a delicious recipe for not one, but TWO homemade dressings and a simple salad to pair them with. The dressings make enough for multiple salads so save those old glass store-bought dressing bottles and reuse them to refrigerate your new favorite homemade dressing. :)

Romaine Salad with Choice of Raspberry Vinaigrette or Creamy Italian Dressing
Raspberry Vinaigrette:
3 tablespoons raspberry vinegar
1 shallot, quartered
1/8 teaspoon ground black pepper
1/2 teaspoon salt
1/2 teaspoon Dijon mustard
1 teaspoon dried thyme
3/4 cup extra-virgin olive oil

Creamy Italian Dressing:
3 tablespoons apple cider vinegar
1 garlic clove, lightly crushed with the side of a knife blade, and quartered
1/8 teaspoon ground black pepper
1/2 teaspoon salt
1 pinch crushed red pepper
2 tablespoons Parmesan
3/4 cup extra-virgin olive oil

Salad:
12 cups romaine lettuce soaked in salt water to remove grit, stiff spines removed, torn into bite sized pieces and dried with a salad spinner (from 2 or 3 heads romaine lettuce)
1 red onion, thinly sliced on a mandolin
1 Vidalia onion, thinly sliced on a mandoline
1 pint grape tomatoes, halved
1/3 cup grated Parmesan
1/4 cup fresh flat-leaf parsley leaves
1 small loaf French bread, sliced, toasted and cut into croutons

Directions
For the raspberry vinaigrette:
Add the vinegar to a blender, replace the lid, turn it on, and through the feed opening, add, 1 at a time, the shallot, black pepper, salt, mustard, and thyme. Then leaving the blender running, add the olive oil in a slow thin stream.

Wash and dry the blender to have it ready to prepare the other dressing.

For the creamy Italian dressing:
Add the vinegar to a blender, replace the lid, turn it on, and through the feed opening, add, 1 at a time, the garlic, black pepper, salt, red pepper, and Parmesan. Then leaving the blender running, add the olive oil in a slow thin stream.

For the salad, toss the lettuce, red onion, sweet onion, tomatoes, Parmesan, and parsley together in a large bowl. Top with croutons, and serve the dressings on the side.

This yummy salad recipe is courtesy of FoodNetwork.com.

Monday, May 2, 2011

Let's the blogging begin...again! (And Spanish Rice)

Ah, Meals by Mel...what happened?

What can I say? I've been busy. I've been unmotivated. I've been distracted. Yes, yes and yes. But I think it's time to come back. I really enjoyed my food blog when I was doing it. And I know a few people who have actually referenced my blog and tried a few of my recipes. I even have a list of recipes waiting in my cue to share with you. So thanks to your positive feedback and requests for me to keep blogging, I am going to get my groove on and start cooking and writing again. Oh, and I know leaving comments are often difficult so I've added a few new buttons at the bottom of each post so you can quickly let me know if you 'like' this post.

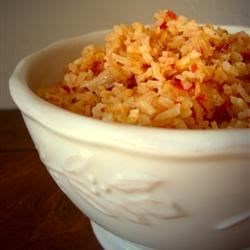
As a way to kick things off, here's the Spanish Rice recipe that I promised to share with you back in February. It's super easy and oh so good!


Spanish Rice

2 tablespoons oil
2 tablespoons chopped onion
1 1/2 cups uncooked white rice
2 cups chicken broth
1 cup chunky salsa

Heat oil in a large, heavy skillet over medium heat. Stir in onion, and cook until tender, about 5 minutes.
Mix rice into skillet, stirring often. When rice begins to brown, stir in chicken broth and salsa. Reduce heat, cover and simmer 20 minutes, until liquid has been absorbed.

Recipe found at Allrecipes.com